Navigation with Nav2
In the previous tutorial we looked at SLAM (Simultaneous Localisation And Mapping). As the acronym suggests, the SLAM algorithms produce two main outputs - a localisation estimate and a map.
With this information we can start building autonomous capabilities for our robot and the first is navigation, where we give the robot a target location and it figures out how to safely get there.
What is Navigation?
We talked a bit about this in the last video, but navigation is where we want to plan and execute a safe trajectory from an initial pose to a target pose.

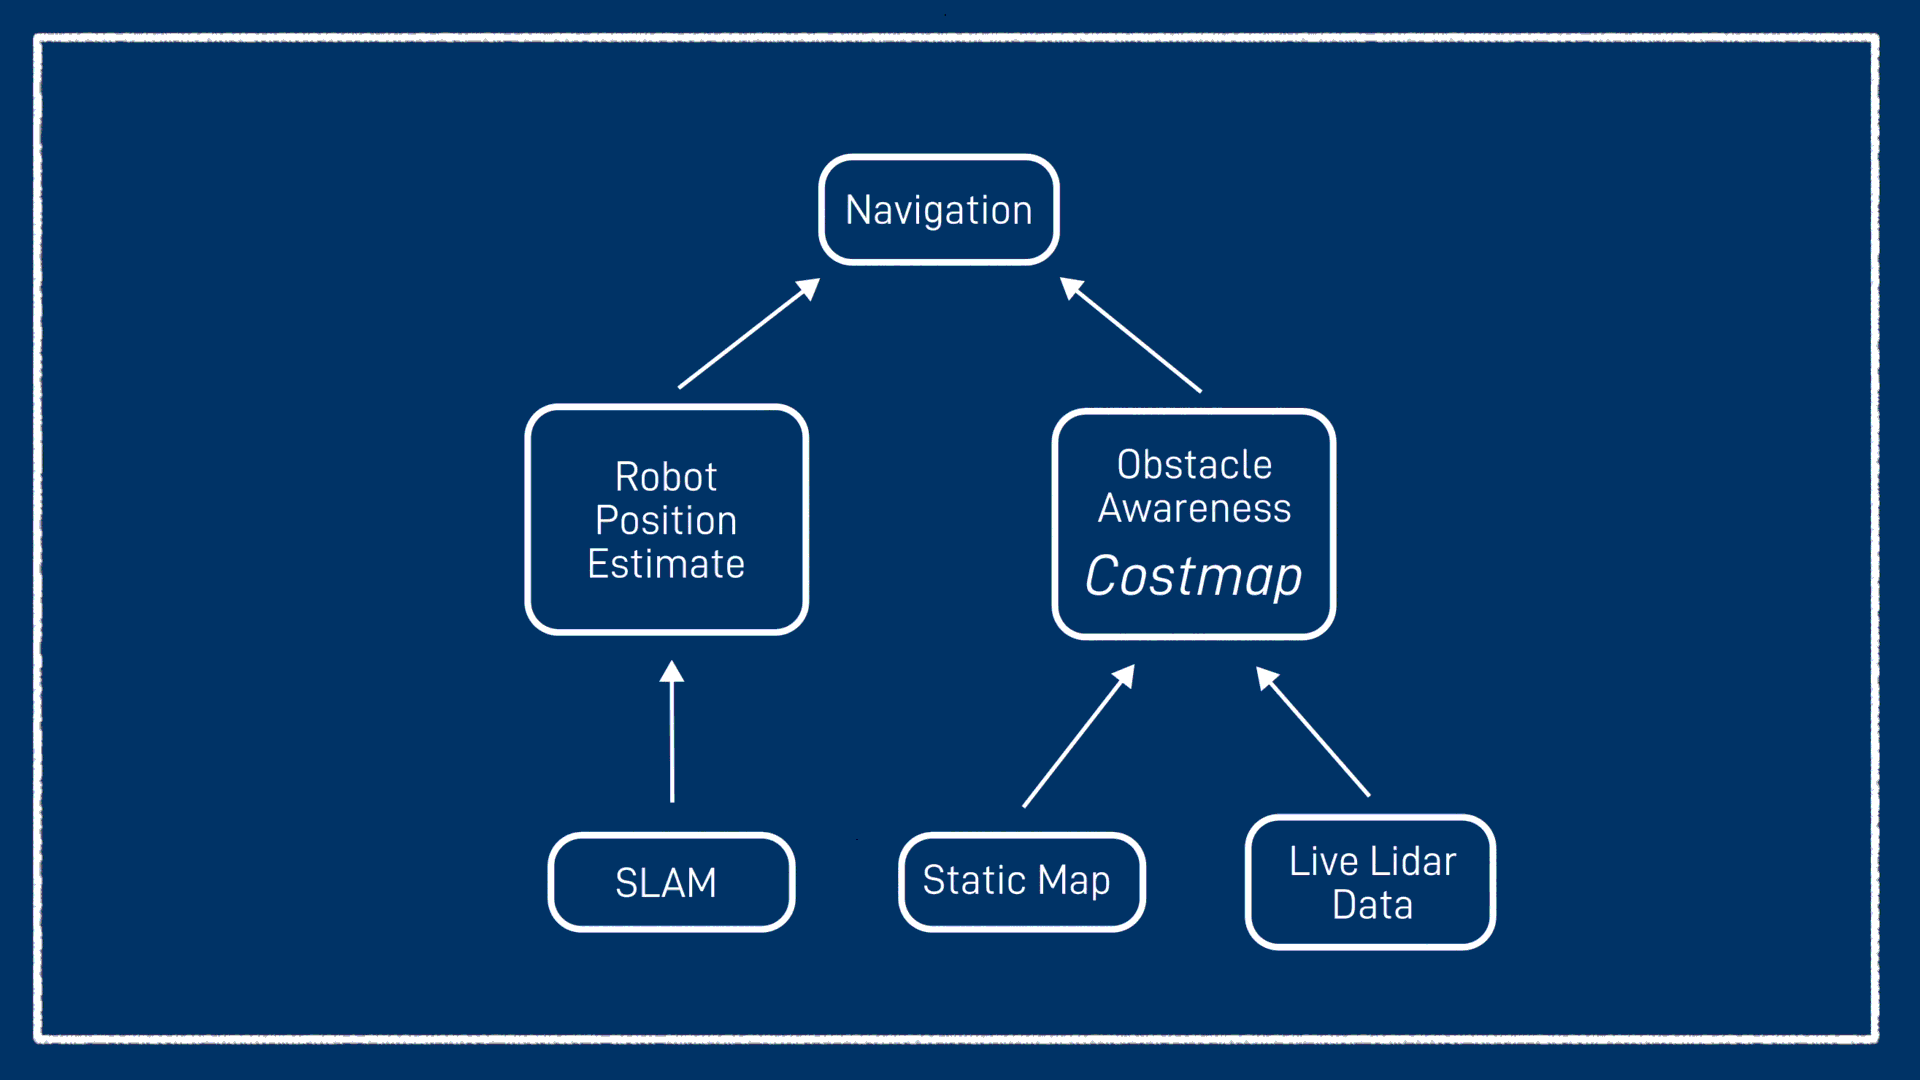
This is firstly going to need a solid position estimate - if we don’t even know where we are, how can we figure out where to go? (This is different from actively tracking a sensed target which we will see in the next video, and doesn’t require localisation). SLAM has provided this for us. Without SLAM or another localisation system, we could try to use odometry but it would likely fall apart pretty quickly.
The second thing we need is an awareness of obstacles around us. This will typically come from one of two places - or both combined. If we already have a map of the environment (e.g. from SLAM), this map can also serve as a basis for navigation. The same obstacles that we were using as a reference point for localisation now become something to be avoided. This is very straightforward with a grid SLAM style map, but also possible with some other map types. Generally we take any cell that was occupied, add a bit of a buffer around it, and what’s left is our safe region.
Alternatively, if a prerecorded map is not available or obstacles are moving, we can dynamically generate a map as we go based on sensor data (typically lidar data). This will prevent our robot from bumping into things which is good, but it means it can’t plan its route from the start and needs to figure it all out on the fly. Ideally we want to combine the two, use an existing map to plan a trajectory, and add any obstacles that we see along the way.
All of this information will be stored in something called a costmap. It’s worth being clear that this map, although it may have been created based on the SLAM map, is different. Its values mean different things, it can be updated separately, and so on. A costmap assigns a cost to different areas, so areas that have a higher cost will be avoided. For this simple example, a high cost will be an obstacle, a medium cost will be the area near an obstacle, and a low cost will be a clear area.
Also typically need to know things about the robot e.g. size, turning circle
Preparation
In the last video we used slam_toolbox to do SLAM in ROS, and its creator, Steve Macenski, is back with another amazing package, Nav2. Just like with slam_toolbox, we are only going to be seeing the very tip of the Nav2 iceberg today, it is a powerful tool that is useful for many navigation tasks.
Install Nav2
To start we need to make sure we’ve got Nav2 installed:
sudo apt install ros-jazzy-navigation2 ros-jazzy-nav2-bringup ros-jazzy-turtlebot3*
Update twist_mux
Then we need to add a new topic to our twist_mux config:
1
Copy and modify Params File
Similar to the SLAM tutorial, we need to copy and modify the params file provided by the nav2_bringup package. Start by copying this file in to the config directory of your main package.
cp /opt/ros/jazzy/share/nav2_bringup/params/nav2_params.yaml src/my_bot/config/
If you like you can also copy the nav2 launch file from /opt/ros/jazzy/share/nav2_bringup/launch/navigation_launch.py to read or modify. If you do, you might like to change the default params file to be the one we just created, by first changing the bringup_dir package name, and then updating the path concatenation to have config instead of params.
As of Jazzy, the Nav2 nodes default to non-stamped Twist messages and the rest of our system uses TwistStamped. There are three nodes in this params file we need to add the parameter enable_stamped_cmd_vel (which otherwise defaults to false). In future versions of ROS this should not be necessary.
1
The default Nav2 parameters are designed to work with the TurtleBot3. If your platform is very different you may need to experiment with the parameters, a process described briefly at the end of this tutorial.
Running in sim
Before we run Nav2, we'll need to get our simulation up and running like normal, with the addition of twist_mux. As a quick checklist, this will involve:
- Starting Gazebo with our
launch_sim.launch.py - Run
slam_toolboxsame as the previous tutorial* - Run RViz and...
- Add a map display for
/map - Change the Fixed Frame to
map - Change the view to top-down orthographic
- Add a map display for
* e.g.
ros2 launch slam_toolbox online_async_launch.py params_file:=src/articubot_one/config/mapper_params_online_async.yaml use_sim_time:=true
If you haven't loaded up a previous map with slam_toolbox, take a minute to drive around and create one.
Then, in a new terminal we can run
ros2 launch nav2_bringup navigation_launch.py params_file:=src/my_bot/config/nav2_params.yaml use_sim_time:=true
To see what's going on, and interact with Nav2, we'll use RViz. Importantly, we need to run RViz with sim time enabled:
rviz2 --ros-args -p use_sim_time:=true
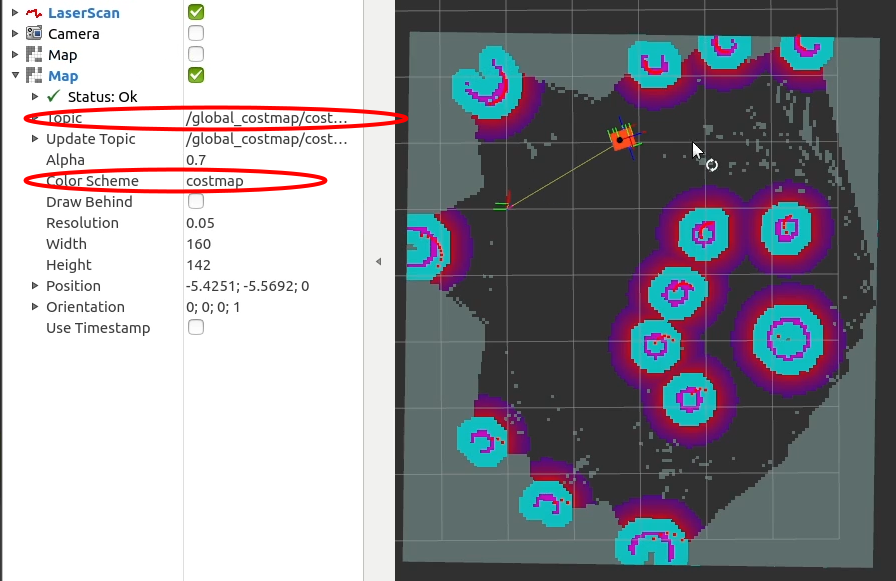
In our Map display, let's change the topic to /global_costmap/costmap, and the colour scheme to costmap. This should allow us to see the obstacles, the exclusion area around them, and also a bit of a falloff zone to be avoided.
If we now select the “2D Goal Pose” option in RViz we can set a target. We can click-and-hold on the location on the map where we want the robot to travel, then drag to shift the cursor in the direction we want it to face once it gets there, before letting go.

Because of how we set up twist_mux, any controls sent by the gamepad will override what Nav2 is trying to do, then once the gamepad is let go Nav2 will resume control.
Running on the real robot
With things working in simulation we can now turn to the real robot. As usual we want to run our main launch file (launch_robot.launch.py), and our lidar driver (rplidar.launch.py) on the robot via SSH. Then, as in simulation, we want to run slam_toolbox and RViz on the dev machine. We can run twist_mux on either the robot or the dev machine, it doesn't matter (we'll merge it in to our launch file soon). If you want to run it on the robot, remember to install it there!
Remember to run slam_toolbox with use_sim_time set to false and create a map of the environment, like we did with the sim.
We are now ready to launch Nav2 from the dev machine, this time with sim time disabled.
ros2 launch nav2_bringup navigation_launch.py use_sim_time:=false
Then, all we should need to do is send a navigation goal in RViz and our robot should move there autonomously!
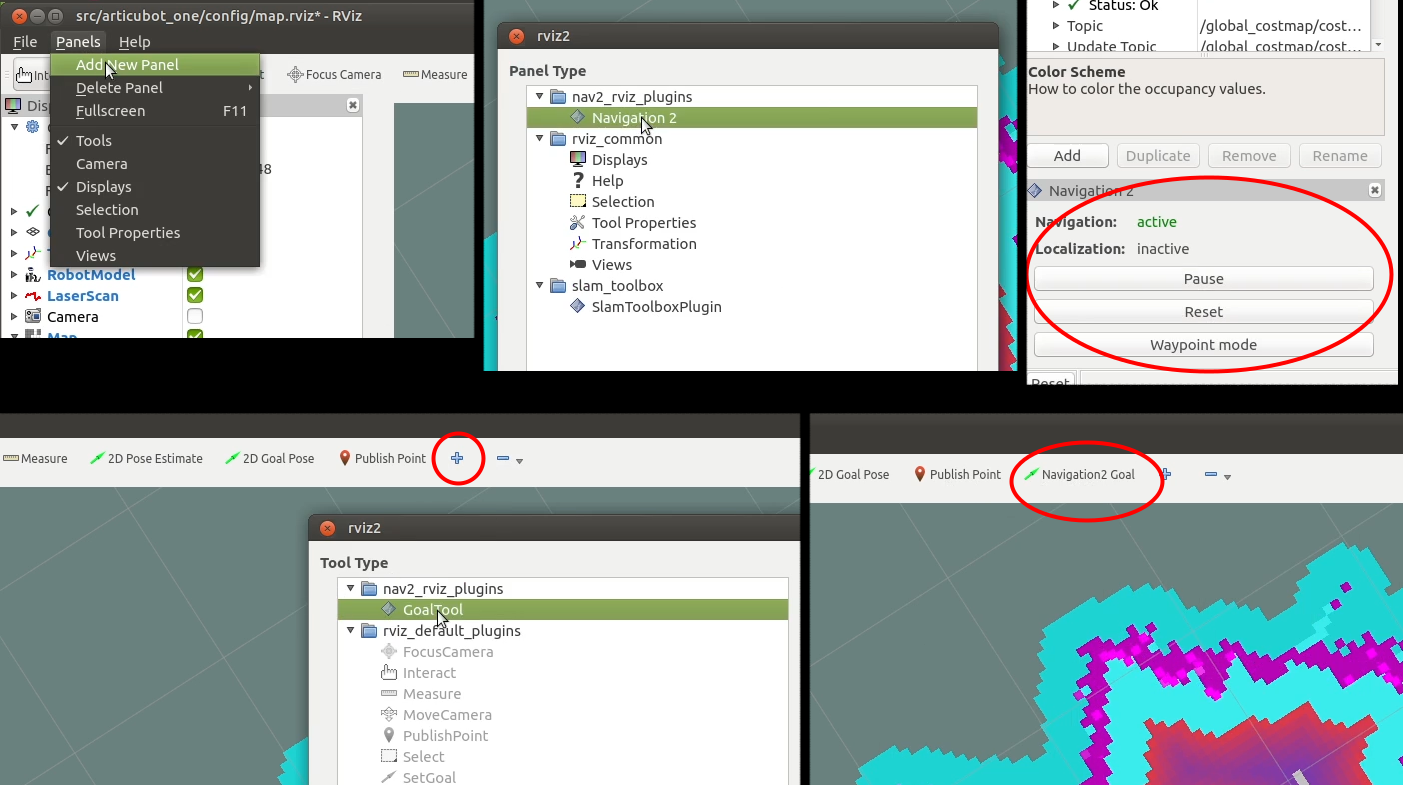
Another thing we can do is to open up the "Navigation 2" RViz panel and also add the "Navigation2 Goal" button to the toolbar. Then, we can switch to waypoint mode which lets us set a whole bunch of waypoints and then hit go to watch the robot step through them all!
Alternatives and improvements
Now that we’ve seen Nav2 in action in Gazebo and also on the real robot, let’s look at some alternatives and improvements we can make.
AMCL Localisation
In the last video we saw that once we have our SLAM map made, we can use it over and over again for localisation.
So what if we want to run Nav2 in this mode? It’s not too hard, there’s just one tiny trick we need.
First, we'll run AMCL localisation. We saw this briefly in the previous tutorial, this time we will use a quicker method. We simply need to run the launch command below, substituting the map path for something appropriate (and changing sim time to false if required).
ros2 launch nav2_bringup localization_launch.py map:=./my_map_save.yaml use_sim_time:=true
Just like last time, we can set the initial position estimate in the map frame, it’s just at the origin. You might remember that to see this map in RViz we need to set the topic durability to “Transient Local”.
This is running both the map server and AMCL that we saw last time. Now we want to run navigation. In a new tab we can launch the nav2 launch file as we did before, but with one extra parameter. There’s a flag that tells it to subscribe to the map with transient local, otherwise just like RViz it won’t see any map.
ros2 launch nav2_bringup navigation_launch.py use_sim_time:=true map_subscribe_transient_local:=true
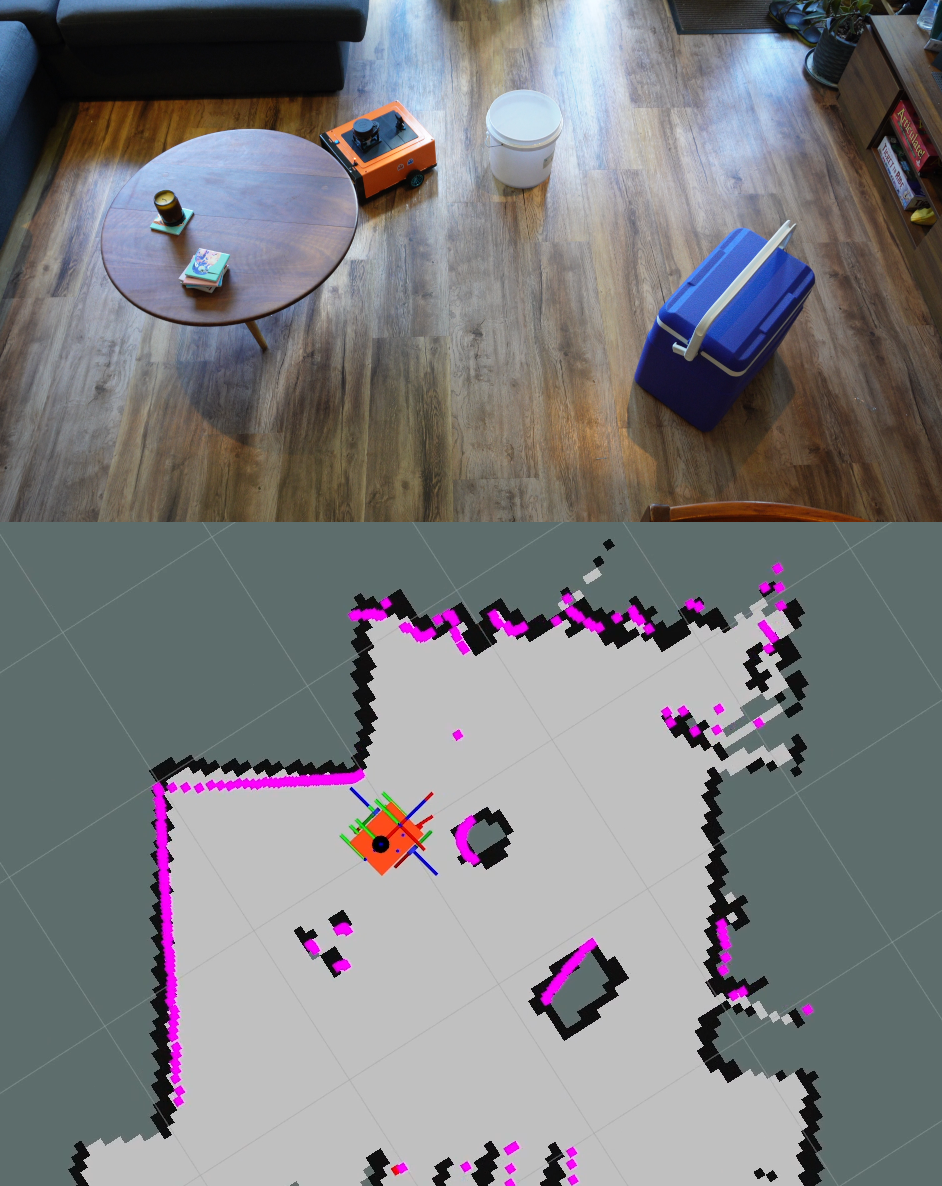
Back in RViz, we can add a display for the new costmap and we’ll see it overlaid on the localisation map. This also lets us demonstrate one of the key features we hadn’t seen clearly before, and that’s nav2 adding new items to the costmap.
To start off with, it’s built its costmap based on the localisation map - great. But now if we hop into Gazebo and drop in a new object, Nav2 will see it in the laser data and add some cost there. If we hide the costmap, we can see that it’s not in the underlying map - because AMCL isn’t mapping so that map is static.
This is good for when an environment has changed. We’ll see it starts to cause us problems soon though, because I haven’t tuned AMCL and so every time the estimate jumps, it starts to throw new obstacles down until the whole place is a mess. That’s not nav2’s fault though, that’s the localisation.
Conclusion
For the first time our robot has done something autonomously! We gave it a task and we could just walk away and it would go about its business. Have a go at making some more complex environments, and see how the robot goes with it. Thanks again to Steve and the Nav2 team for another fantastic package.
Again, just like with the last video, there is so much more that Nav2 can do beneath the surface, for now we’re just seeing how easy it is to get a simple navigation process going.
In the next video we’re going to use a different sensor for autonomy - the camera. We’re going to use the camera to spot a moving target and use the robot to follow it around - make sure you don’t miss that.
As always, check out the description for a link to the discussion thread over on the Articulated Robotics discourse and let us know any questions or comments you have. And thanks so much to all the patrons over at Patreon who make this possible.
See you next time!